Running out of oil is one of the quickest ways to ruin an engine, but not changing it can have the same effect over time. Oil gets dirty as it runs through your engine, and it loses some of its ability to keep things slick.
Further reading
Generally speaking, on modern vehicles you need to change your oil every 7,500 miles or every couple of years (3,000 miles is still valid for older models). The factory sets the precise interval, so browse through your owner’s manual, call your dealer, or look online if you’re not sure. How often you should change your oil also depends on the type of driving you do and whether you’re using traditional organic “dino” oil or artificial synthetic oil. Synthetic tends to last longer than “dino” oil and is preferred in most cases.
Changing the oil in your car can be a grimy task, to say the least, so many individuals simply shell out the extra cash and let a mechanic or an oil change shop handle the dirty work for them. Taking on the task yourself, however, can save you plenty of money over the lifetime of your vehicle and it will add to your list of life skills learned.
Ready? Let’s get started. First, you’ll need to buy a sufficient amount of oil, a new oil filter, and some other simple tools if you don’t already have them.
You will need:
- Car jacks or floor ramps
- A basic socket wrench set
- An oil filter wrench
- A washer for the drain plug
- A couple of rags and/or a roll of paper towels
- Rubber or latex gloves to keep your hands clean
- An oil drain catch pan
- A clean funnel
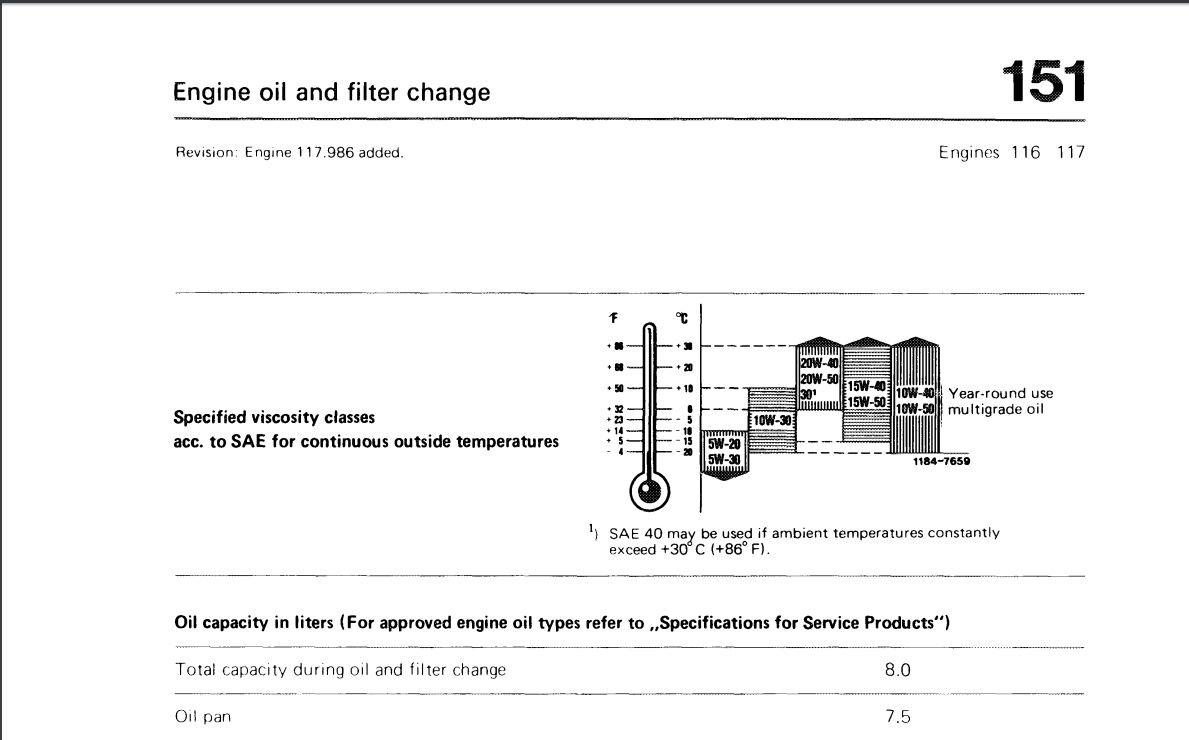
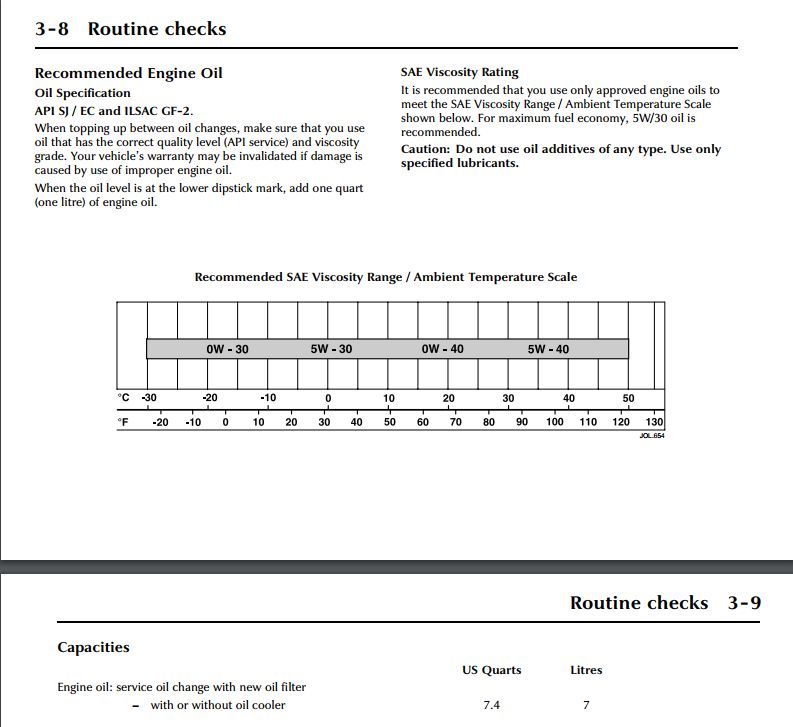
Identify the type of oil required by your engine; this information is typically found in the owner’s manual, though some new cars have it stamped directly on the oil cap. One common type of oil is 10W-30.

You’ll then have to purchase an oil filter and a washer for the drain plug at your local auto parts or other store. They often have dedicated aisles for motor oil and associated filters. Typically, a buyer’s catalog is available next to the shelves with oil filters. There, you can look up your vehicle, find its oil filter part number, and locate the item on the shelf.
Step 1: Park your car on a flat surface with plenty of room to work
Unless you drive a car with plenty of ground clearance, like a Jeep Wrangler, you’re most likely going to have to raise the end of your vehicle where the engine sits. You’ll want plenty of space to work and you’ll need to make sure your car is on a flat surface so that it doesn’t roll when you jack it up. Be sure to let the engine cool sufficiently before you begin draining its oil. Keep in mind parts like the exhaust get extremely hot.
Step 2: Raise the end of your vehicle where your engine sits

The engine is up front in a vast majority of cars on the road today. It’s in the middle in some sports cars, like the Porsche Boxster, and it’s occasionally positioned in the back (in a Volkswagen Beetle, for example).
Although many SUVs and trucks have enough clearance beneath their frame for you to perform an oil change, the majority of smaller vehicles have minimal clearance and must be elevated — using either a ramp, lift, or jack — before you can get started. If you use the latter method, ensure the vehicle is securely positioned on a level surface before climbing beneath. Putting chocks behind the wheels that remain on the ground is a good idea. See our guide on how to jack up our car here.
Step 3: Locate the oil pan and drain plug
Now that you’re under the car, the next step is to locate the oil pan and its drain plug. Below is the location of the oil drain plug at the bottom of the motor on our 1974 Mercedes-Benz 450SEL restoration project. It requires a 14mm hex socket bit in order to be removed. The drain plug’s size will vary from car to car.

Place your oil drain pan directly under the drain plug and position it to be ready to catch the oil directly beneath and a few inches ahead of the plug. Remove the engine oil cap from the top of the motor so that the engine can drain its oil easier by displacing the flowing oil with air.
Step 4: Open up the oil pan’s drain plug and allow the oil to drain

Turn the plug in a counter-clockwise motion (remember: right-tighty, lefty-loosey) with the appropriate-sized socket or bit.
It may take a few minutes for the engine to drain entirely, but when the steady stream of oil has become a sporadic drip, you’re now ready for the next step. Screw the drain plug back into place with a clockwise motion and tighten it properly. Don’t forget to replace the drain plug’s washer.
Step 5: Remove the old oil filter and replace with a new one

Once most of the oil is drained from the engine and the pan plug is replaced, locate your engine oil filter. It’s normally a cylindrical part that extends out from either the side or the bottom of the engine block. On some cars, like on certain Subaru models with a flat engine, the oil filter is accessible from the top. However, it’s important to note that it varies greatly by car and the type of engine it comes with. It’s much easier to just identify what an oil filter looks like so you can find it on any engine.
Unscrew the oil filter from where it sits (again: righty-tighty, lefty-loosey) using either a pair of wide-grip pliers or an oil filter wrench. Be sure to position your drain pan under the filter’s location as the oil it contains will leak out.
Install the new filter after applying a little bit of oil to the rubber ring around its edge. This will help create a better seal while making it easier to remove during your next oil change. And, don’t over-tighten the filter; you run the risk of stripping the threads on the filter housing, which could create a major problem. Hand-tight is fine in most cases.
Step 6: Add the new oil

Rest easy, the hardest part is now behind you. Remove your car’s oil cap, get out a funnel, and pour the required amount of oil into the engine. Make sure nothing leaks from the drain plug or the oil filter housing. If this does occur, tighten the components as needed.
If your engine requires 7 quarts, remember to only put 7 quarts in! Too much or too little oil can mean the premature death of your engine and turn your car into one very expensive paperweight. Oil is sold in either single-quart containers or 5-quart jugs. So if you need 7 quarts, you can buy seven individual containers or buy two 5-quart jugs, which equal 10 quarts. Buying the 5-quart jugs is usually cheaper, and you’ll have some left over if you ever need to top it off in between oil changes.
Both types of oil containers feature scales that help you keep track of how much oil you’re pouring in.
Step 7: Check the oil level, tighten the engine oil cap, and start the engine

After pouring in the correct amount of oil, let your car sit for a few minutes as the oil drips into the sump. Then, check the level with the engine’s dipstick. It’s usually on the side of the engine with a loop that’s often painted yellow or red. Wipe off the dipstick, insert it back into its housing, and remove it again to get an accurate reading. Make sure the level is between the indicators etched into the dipstick. If it’s too low, slowly add in more oil until you reach the correct level. If you’ve put in too much, you’ll want to drain it slowly until you reach the correct level.
You’re now ready to start the engine. Let it idle for a minute or so, turn it off, let it sit for a few minutes, and check the oil one last time. It’s also important to monitor the oil pressure gauge in the instrument cluster (if you have one) while it’s running. Keep an eye out for warning lights on the dashboard, too. If everything checks out, wash your hands and give yourself a well-deserved pat on the back.
Don’t forget to recycle your used oil. Pour it into a sealed and transferable container and take it to your local auto parts store or mechanic shop. There, someone will dispose of it safely and, hopefully, free of charge.


