
Apple added notifications to Mac OS X with Mountain Lion in 2012, and has expanded the feature with each release of the operating system since then. In Yosemite, it receives its greatest upgrade yet; a notification center that can pull data from various apps and social media services. Here’s how to use and get the most ouf of the new Notifications center in Yosemite.
Connecting your accounts
You’ll only receive notifications from supported third-party services if you set them up in OS X Yosemite. This is accomplished not though the Notifications app, but through the Internet Accounts menu in System Preferences. Here you can enter login details for iCloud (of course), Microsoft Exchange, Google, Twitter, Facebook, LinkedIn, and Yahoo. Adding an account enables a variety of features, one of which is notifications.
Third-party services are the only accounts you must add to enable notifications. First-party apps are automatically added. This includes FaceTime, Game Center, Mail, Messages, Reminders, Safari, and several others. You’ll always receive notifications from these apps, unless you specifically turn them off.
Managing notifications
Notification settings are located in System Preferences under the appropriately named Notifications menu. The settings for each item in this menu varies based on their specifics, but there are some general settings that they all share.
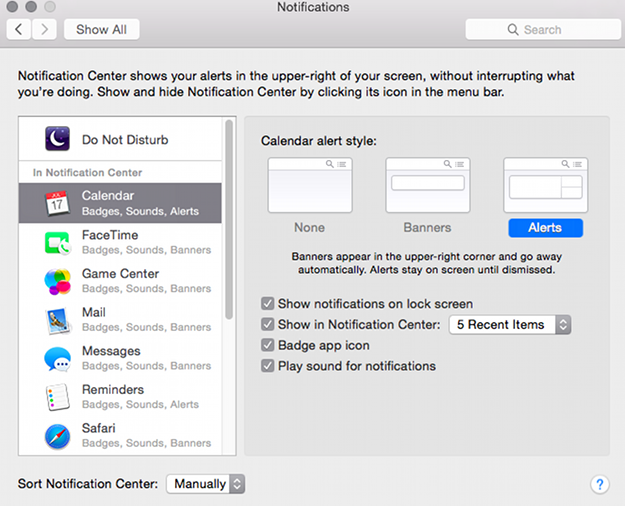
Alert style is one of the most important features. Alerts are the small pop-ups that appear in the upper right hand corner of OS X Yosemite when a new notification appears. There are two styles to choose from; banner and alert. A banner simply tells you a notification has appeared, while an alert provides buttons for any applicable action. For example, a Calendar event alert will let you close or snooze the event.
You also can select “none,” which disables alerts for that app or service, but does not disable notifications. They will still appear in the notification center. You just won’t see a pop-up every time a new event occurs.
There are a few other important settings that all apps and services share. “Show notifications in lock screen” determines if the alerts will appear when a Mac is locked. This could pose a privacy issue, so you may want to turn it off. You can also decide how many recent notifications appear in the notification center, and whether a sound plays when a new notification arrives.
The notification center
The new notification center can be accessed by clicking its icon in the upper right hand corner. You’ll always find it there, and the center always slides out from the right – that can’t be changed. Once open, you’ll see the Today tab, which is actually more of a widget bar, and the Notifications tab, which is where your notifications actually live.
In the Today tab, you’ll see a calendar, a daily summary, stock market quotes, and weather. You can arrange the order of these widgets by clicking on the title bar of each, and then dragging it where you like. You can also remove them by hitting the “edit” button at the bottom of the Today tab. This opens a panel that stores widgets which aren’t in use.

The Notification tab doesn’t have as much going on. You’ll see all of your recent notifications (by default, most apps show the five newest ones) and you can click on them to go to the event, or you can remove them by hitting the tiny “x” icon on the title bar. You can’t change the order in which they appear, however.
Also, you can access the App Store from the Today tab by hitting edit, which will show a new App Store button. Apple apparently intends for third-party developers to add more widgets. Finally, you can access the Notifications menu by hitting the gear icon in the lower right.
Conclusion
Adding a notification center to Yosemite completes the operating system’s symmetry with iOS in this area. Even the design of the interface is similar to iOS 7 and (presumably) iOS 8. This, however, does not downplay its functionality. Having an all-in-one place to view the latest updates from both local apps and third-party services is a great boon.
If you want to read up on Yosemite’s other new features, feel free to check out these guides on how to make calls and send texts in OS X, how to use Mail Markup, and how to make the most of the revamped version of Spotlight.
Editors' Recommendations
- How to download macOS 14 Sonoma
- How to combine PDF files on Windows, macOS, or the web
- How to use iMessage on Windows
- MacGPT: how to use ChatGPT on your Mac
- Ranking the best (and worst) versions of macOS from the last 20 years


