You can use a Crafting Table to create anything in Minecraft, from swords to switches and everything in between. But there’s another type of crafting tool you can use to make and repair enchanted weapons and armor. We show you how to make an anvil in Minecraft so you can craft the cool items that simply can’t be done in the Crafting and Enchanting Tables.
Before diving in, there’s a lot to consider when working with the anvil in Survival Mode. You can’t just create an enchanted weapon and be on your way. There’s an associated XP cost that may lock an enchantment or repair until you obtain more experience. If you’re playing in Creative Mode, however, there’s no actual XP cost weighing you down despite the anvil showing otherwise.

With this guide, there is no long list of ingredients. All you need to start with is iron ore, and then you move on to smelting iron ingots, crafting blocks of iron, and then putting both together to craft your anvil.
Smelt iron ingots

Iron ore must be smelted in the furnace to create iron ingots. You can find iron ore located 5 to 25 blocks below the surface. These blocks have gold and tan specks, as shown above.
Step 1: Open your furnace.
Step 2: Place iron ore into the top square.
Step 3: Place fuel into the bottom square, like wood, charcoal, or coal — anything that burns.
Step 4: Drag the resulting iron ingot down into your inventory.
Note: As shown above, you can insert multiple iron ore blocks and fuel into the furnace. It will continue to smelt iron ingots until one or all resources are depleted.
Ultimately, you need to smelt 31 iron ingots: 27 to create three blocks of iron (nine each) and four more to make the anvil.
Craft blocks of iron

You’ll need lots of iron ingots to create these blocks of iron!
Step 1: Open your Crafting Table.
Step 2: Place one iron ingot into each square in the crafting grid, totaling nine iron ingots.
Step 3: Drag the resulting block of iron down into your inventory.
Step 4: Repeat these steps two more times to craft the three blocks of iron you need.
Craft an anvil

Now we can craft this anvil thing and see what it’s all about.
Step 1: Open your Crafting Table.
Step 2: Place one block of iron each into all three squares in the top row.
Step 3: Place one iron ingot into the center square in the middle row.
Step 4: Place one iron ingot each into all three squares in the bottom row.
Step 5: Drag the resulting anvil down into your inventory.
Now that you have an anvil, you need to understand the mechanics of using this tool before opening it for the first time.
Repairs
At first glance, you’d think that your new anvil would be perfect for repairing all weapons and armor. But that’s not the case at all. Here’s what you can do and where regarding repairs:
Inventory or Crafting Table
- Repair using identical, non-enchanted items.
Anvil
- Repair using the target non-enchanted item and its root ingredient.
- Repair using the target enchanted item and its root ingredient.
- Repair using the target enchanted item and an identical item (enchanted or non-enchanted).
Enchanting
You can use the anvil to add enchantments to weapons and armor. The benefit of using this tool over an Enchantment Table is that you can enchant an item up to six times — only once on the Enchantment Table. There’s no lapis cost, and you can enchant a wider variety of tools too.
The drawback is that an anvil eventually breaks, and you must have an enchantment book, both of which do not apply to Enchantment Tables. The anvil requires a higher XP cost as well.
XP is like currency
Minecraft gamers playing in Creative Mode don’t need to worry about levels and currency. You can just repair and enchant weapons, armor, and tools without a thought.
Survival Mode really digs into the heavy nitty-gritty of Minecraft’s mechanics, however. At the forefront is the leveling system, which involves collecting little green orbs from falling mobs and from bottles of enchantment. In turn, this collected experience can be used as currency to spend on repairs and enchantments.
The overall cost of using an anvil varies per item. At the heart is the Prior Work Penalty that adds an XP penalty each time you modify an item. The formula is 2n – 1 whereas “2” is two base levels of work penalty for every modification and “n” is the number of previous modifications. For instance, if a sword is reworked five times, the resulting penalty is 31:
2 x 2 x 2 x 2 x 2 = 32 – 1 = 31
That means 31 XP will be deducted from your current XP pool. For instance, if you only have 20 XP and a weapon repair costs 7 XP, you’re reduced to 13 XP. In Survival Mode, you can’t spend beyond the 39 XP cap, as the anvil will display the cost in red text versus green (or read “too expensive”). These numbers are irrelevant in Creative Mode.
In the Java Edition, you’ll see this cost labeled as Enchantment Cost while Bedrock Edition lists it as XP Cost. This label and associated cost appear in the anvil when you insert an item into both slots.
All new items start at 0 XP penalty. Here’s a quick reference:
| # or Reworks | Penalty |
| 0 | 0 |
| 1 | 1 |
| 2 | 3 |
| 3 | 7 |
| 4 | 15 |
| 5 | 31 |
| 6 | 63 |
| 7 | 127 |
Keep in mind that this applies to a single item you throw into the anvil. One item may have a specific Prior Work Penalty and the second item will have a different Prior Work Penalty, resulting in a combined item that may cost a different penalty amount than what’s shown in the chart.
Anvil use can get complicated

Before we dig deeper, we need to clarify the anvil’s three squares:
Left (blue) — The Target item. You are modifying whatever you place in this square. However, mechanically, you are adding it to whatever you place in the middle square. This is important to remember.
Middle (red) — The Sacrifice item. This is what you use to modify the Target item in the left square. This may seem a little weird if you’re repairing an enchanted sword, but you’re simply sacrificing this item and transferring the enchantment and remaining durability to the Target item.
Right (green) — Your resulting item.
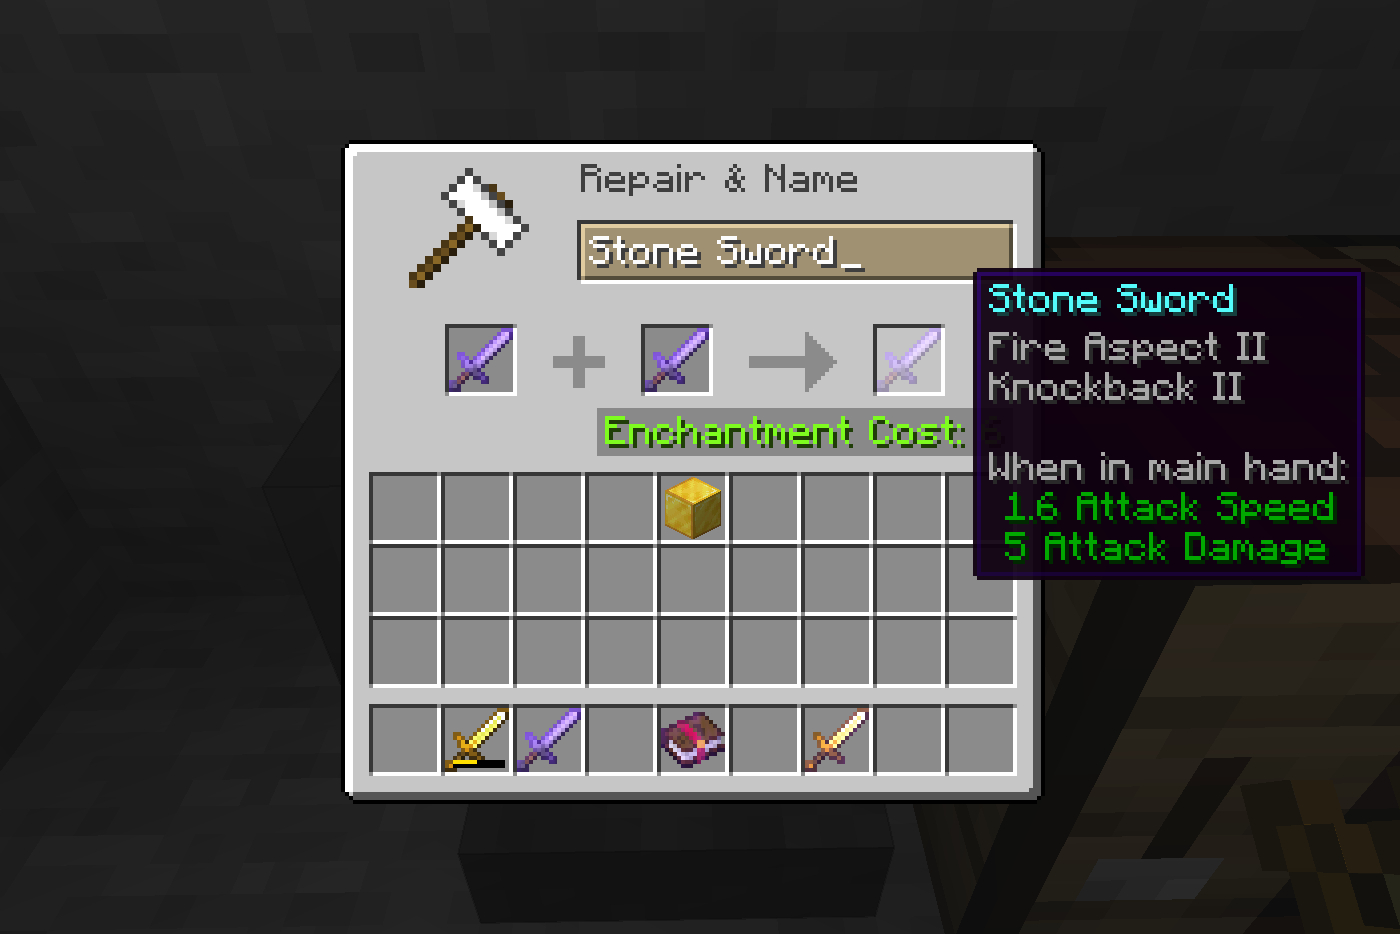
Here is an example using four enchanted books and a new diamond sword.
- Fire Aspect II + Unbreaking III = 3XP (cost 4XP reversed)
- Sharpness V + Knockback II = 2XP (cost 5XP reversed)
- Sharpness V / Knockback II + Fire Aspect II / Unbreaking III = 9XP
- New Diamond Sword + Enchanted Book (all four listed above) = 17XP
- Rename Enchanted Diamond Sword = 8XP
Because Unbreaking III cost 3XP anyway, adding Fire Aspect II didn’t increase the cost. Adding Sharpness V to Knockback II didn’t increase the cost beyond 2XP, but had the books been reversed, we’d pay 5XP for adding Knockback II to the Level 5 Sharpness.
So how does Minecraft figure these penalties? It’s complicated, but here’s our best effort to explain. An enchantment has separate, set multipliers for books and items. For instance, the multiplier for Fire Aspect is two for a book and four for an item. Unbreaking is one for a book and two for an item.
When we add Fire Aspect II to Unbreaking III, the cost is only 3XP because Unbreaking III already costs 3XP (aka Level 3) and we’re multiplying by one. If we add Unbreaking III to Fire Aspect II, then the math is Level 2 x 2 = 4XP.
What if you’re using a sword and a book? If our diamond sword is new, then it has no prior penalties (zero). Add it to Fire Aspect II and the math is still Level 2 x 2 = 4 due to the enchanted book. If we place the resulting diamond sword with Fire Aspect II in the left square and Knockback II in the second square, the cost is 3XP. Why? The sword now has 1XP penalty, the book has a 2XP penalty, and the multiplier is one. Thus, the math is Level 1 + Level 2 = Level 3 x 1 = 3XP.
What if you need to repair your Fire Aspect II sword? The cost is 9XP. That’s because Fire Aspect II has a multiplier of four when used with items, and the sword itself is now Level 1. The math would then be Level 2 x 4 = 8XP (enchantment) + 1XP (sword) = 9XP total. The sword we added to the mix as the Target didn’t have any prior penalties.
Is your brain melting yet? Remember, you absolutely want to place the item with the lowest penalty in the middle square. Anything placed in the left square — weapon, sword, or book — is added to the middle square item. If you’re enchanting a weapon or armor, it can only go into the left square anyway.
Overall, our example combined four enchanted books, applied the final book to a new diamond sword, and then renamed it. In total, that cost us 39XP. Sure, we could have saved some XP cost by naming the diamond S=sword first for 1 XP, combining books of the same enchantment level, and then applying the four-enchantment tome to our sword.
There’s a handy chart on the Anvil Mechanics Wiki that lists all the enchantments and their penalties. Another online handy tool can calculate your anvil XP cost after you enter the Target and Sacrifice objects and their current penalties. This latter tool may help you understand why a combination of two items has a specific XP penalty.
With all the calculations talk out of the way, let’s see how to actually use the anvil.
Repair with an anvil

Repairing requires an identical item or the base ingredient. For example, if you’re repairing a wooden sword, you need an identical wooden sword or a wood block. A golden sword requires another golden sword or a gold ingot, as shown above.
Step 1: Open the anvil.
Step 2: Place the item you need repairing in the left Target square.
Step 3: Place an identical item or root ingredient in the middle Sacrifice square.
Note: You cannot repair a wood sword with a golden sword, etc.
Step 4: Drag the repaired item down into your inventory.
Step 5: Repeat as necessary until your Target item reaches full durability.
Rename with an anvil

This costs one penalty level plus all prior work penalties. In this case, we used a golden sword with a 1XP penalty, resulting in a @XP overall cost. Apparently, we need to go kill all the skeletons lurking outside to gain more XP!
Step 1: Open the anvil.
Step 2: Place your item in the left Target square.
Step 3: Select the text box and enter the new name.
Step 4: Drag the renamed item down into your inventory.
Enchant with an anvil
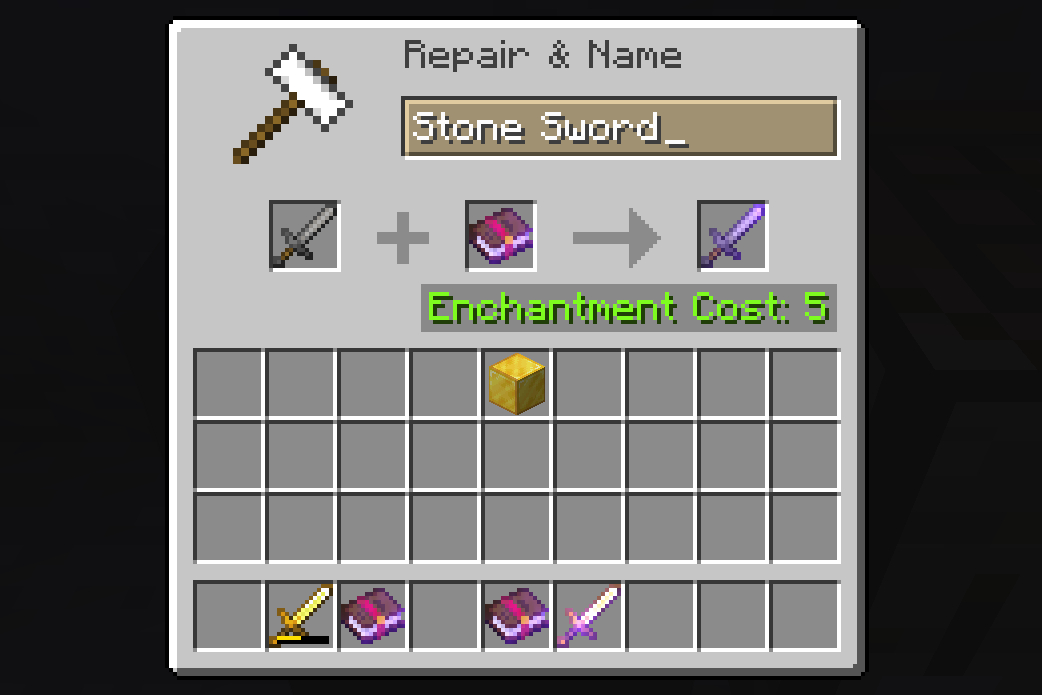

Step 1: Open the anvil.
Step 2: Place the item you want to be enchanted in the left Target square. This item can already have a prior enchantment. You can also insert an enchantment book if you’re aiming to combine two books.
Step 3: Place an identical item or enchantment book in the middle Sacrifice square.
Step 4: Drag the enchanted item down into your inventory.


