No matter how much you spend on your new TV, calibrating the picture is a necessary step to get the best home theater experience. Since TVs on display in stores need to compete with showroom lighting, the default picture settings are often not ideal for home use. Even TVs with multiple image presets need some work.
Anyone is capable of calibrating a television, as long as you follow the right steps. With the right settings, you can have a display that works best for your home. Our TV tune-up guide will help you quickly set up your best picture quality.
Pick your process
This guide is designed to help those who want to do a manual adjustment without the aid of a calibration disc. Actually, we recommend you start with an “eyeball” calibration first, even if you do intend to use a disc for help. It will get you closer to your ideal settings and facilitate faster fine-tuning later.
You could also choose a calibration disk that you would use in an accompanying Blu-ray player. While many may be wondering about separate techniques for adjusting 4K Ultra HD TVs — especially those with high dynamic range (HDR) — we regret to say there are very few viable calibration discs available to the general public at present. You’ll find some YouTube test patterns available, but their usefulness is limited compared to scenes you can find simply by playing a favorite movie or show.

If you really want a calibration disc to work with, we suggest the Spears & Munsil HD Benchmark and Calibration. In our experience, this is one of the most intuitive calibration and testing discs available to the enthusiast. It provides clear, easy-to-understand on-screen instructions as well as online support, and it does away with the often corny and cheesy voice-overs associated with other calibration discs. The only downside is that it doesn’t include audio adjustment, but if audio help is what you need, we’ve got you covered here.
If you want to try a completely different approach — one that doesn’t involve a disc but rather your iOS or Android device — check out THX’s Tune-Up app. It connects to your TV via HDMI (separate adapter required) and uses your iOS or Android device’s camera to assist you. You can learn more about the app at the App Store (iOS) or Google Play store (Android).
Talk the talk
There are many terms at play when discussing picture quality and its various aspects. Though many of these terms tend to be easy to pick up and understand immediately, TV manufacturers seem intent on making things more confusing by applying their own proprietary nomenclature to terms like contrast, saturation, etc., or trademarked names to technology like local dimming or backlighting.
While we’re going to be using the basic terms in this article, they may be different from what your TV lists. To help make things clearer, we’ve included the following table to describe how different TV manufacturers refer to basic terminology.
| LG | Samsung | Sharp | Sony | Vizio | |
| Backlight | Backlight/OLED Light | Backlight | Backlight | Brightness | Backlight |
| Brightness | Brightness | Brightness | Brightness | Black level | Brightness |
| Color | Color | Color | Color | Color | Color |
| Color space | Color management | Color space | C.M.S. | Advanced color temperature | Color tuner |
| Color temperature | Color temperature | Color tone | Color temperature | Color temperature | Color temperature |
| Contrast | Contrast | Contrast | Contrast | Contrast | Contrast |
| Dynamic contrast | Dynamic contrast | Dynamic contrast | AquoDimming | Advanmced contrast enhancer | Black detail |
| Full/limited RGB | Black level | HDMI black level | Black level | Dynamic range | |
| Local dimming | LED local dimming | Smart LED | N/A | Auto local dimming | Acrive LED zones |
| Motion interpolation/Motion smoothing | TruMotion | Auto motion plus | Motion enhancement | Motionflow | Reduce judder/Reduce motion blur |
| Noise removal | Noise reduction and MPEG noise reduction | Digital clear view and MPEG noise filter | Digital noise reduction | Random noise reduction and Digital noise reduction | Reduce noise |
| Picture mode | Picture mode | Picture mode | AV Mode | Picture mode | Picture mode |
| Sharpness | H & V sharpness | Sharpness | Sharpness | Sharpness | Sharpness |
| Tint | Tint | Tint | Tint | Tint | Tint |
| White balance | White balance | White balance | Advanced color temperature | Advanced color temperature | 11 point white balance |
Getting ready
Before we launch into making any changes in your TV’s settings, there are a few things we need to do first to make sure the stage is set for a hassle-free and successful calibration.
Pick your sources
Our top source recommendation is a Blu-ray disc player — either of the standard or Ultra HD variety — or game console. These devices deliver a full 1080p image, and in some cases 4K resolution and/or HDR. That sort of detail will come in handy later. Plus, calibrating your TV for the best possible picture source right out of the gate just makes sense. If you don’t own a Blu-ray player, an HD cable/satellite box with DVR is your best alternative. The key is to get the best source possible while maintaining the ability to pause images as needed. Whatever source you choose, you need to you connect it to your TV via HDMI cable.
For source material, we recommend a high-definition movie or TV program that was natively recorded in HD or 4K Ultra HD as it applies to your display. Pick something that has a good blend of bright and dark scenes as well as a lot of color. Avoid dreary, under-saturated shows, such as Game of Thrones. Computer-animated films can make excellent sources of vivid color and resolution detail, but live-action films are going to be better for judging more subtle aspects like skin tone accuracy and shadow detail.
Pick a picture mode
Your TV will come with several different picture modes and presets. These are usually labeled sports, games, vivid, movie, cinema or standard — some will even get specific as to which type of sport. Most of these are horribly out of whack. Steer clear of sports and vivid or “bright” modes, as these are consistently the worst offenders and, because they are so overly bright, will reduce the long-term life of your TV. The movie, cinema or standard settings serve as the best launchpads for creating your own custom settings. They may appear a little dark for your taste at first, but we’ll be fixing that. Once your adjustments are made, they may be saved under a “custom” setting rather than altering the factory pre-set. Those that do alter the factory pre-set will usually provide a factory reset option, as well as an option to make the settings “Global” and be applied across all sources.
Stuff to turn off
Today’s TVs come with a long list of different processors intended to enhance images in one way or another. While some of these can prove valuable, it is best to defeat them while adjusting — you can always turn them back on later when you’re finished. Keep in mind that a Blu-ray disc image is natively very high quality and requires little to no processing help anyway.
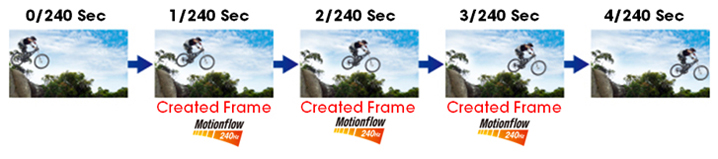
The very first thing we suggest you disable is the motion smoothing feature, e.g., MotionFlow, CineMotion, TrueMotion, CineSpeed 120Hz, 240Hz, 480Hz or something else along those lines (check the above table). These processors make everything you watch look like a soap opera and defeat the cinematography that makes films look amazing.
Other picture enhancements that can often be disabled for improved quality may include edge correction, digital noise reduction (DNR), MPEG error correction, flesh tone, dynamic contrast, black enhancement, and HDMI black level, among others.

Making your adjustments
In the following section, we’ll cover most of the basic adjustments that users can make without breaking into the locked “service settings” of your TV. We’ll talk a little about what these adjustments do and what to look at to make sure you’ve got the best setting.
(Note: We highly recommend that only qualified service technicians get into the locked service menus. Just one adjustment in the wrong direction can throw an array of other settings off — that’s why they’re locked!)
Backlight
This adjustment controls the intensity of the backlight on an LCD/LED TV. For those who have their TV in a dark room or basement, this setting won’t need to be terribly high. For those in brighter rooms, more backlight intensity will be desired. Try to avoid making this adjustment while the sun is shining directly on the screen, as this will result in an unnaturally high setting. Instead, make your adjustments when the room light is at its average for when you watch, and pick a program or movie scene with a lot of white in it — a daylight scene on a snow-covered mountain, for example. If after watching the scene for 10 minutes you begin to squint, the backlight is too strong. Reduce the backlight and repeat until you are happy.
Brightness
The term “brightness” is a little misleading since the setting actually has more to do with the black level of your TV. Setting the brightness too high will result in grayed-out blacks and a loss of dimension. When brightness is set too low, you will lose detail in dark areas of the screen (called clipping). The easiest way to adjust the brightness is to use the black letterbox bars at the top and bottom of a movie.
These bars are meant to be dead black, and will usually be darker than the black background often found in movie credits. Pause on your scene of choice and turn the brightness up until the letterbox bars appear grey. Then, reduce the brightness just until the black bars are totally black.
Once this is done, find a scene that involves large dark sections that still contain detail. If the brightness is set too low, you’ll be missing details in dark scenes and shadowy areas. Keep in mind that there is such a thing as “blacker than black.” Not all details in shadows are meant to be visible.
Contrast
Contrast is, like brightness, a misleading term because this adjustment actually deals with the brightness and detail within the white portions of an image.
Ultimately, your contrast setting will come down to personal preference, but we advise that you resist the urge to simply jack the contrast up. Find a scene with a bright, white image in it and hit the pause button. Adjust the contrast to the point where the white object is bright, but still contains detail and crisp edges. A good starting place is the halfway mark. From there you should have no problem finding the setting that suits you.
(Note: You may have to bounce back and forth between the contrast and brightness settings to find the optimum combination. This is normal and can take a little time, but the final result is worth the effort.)
Sharpness
It is a common misconception that turning the sharpness on a TV to its maximum will provide a sharper picture. Truth be told, high-definition images usually need little or no sharpness enhancement. You can play around with this setting by pausing your source on a scene that provides lots of straight lines; for instance, a scene with lots of buildings or other uniform shapes like stadium bleachers.
If you turn the sharpness to its maximum, you should notice that the straight lines will become jagged. This is the TV introducing artifacts to the image that shouldn’t be there. Reduce the sharpness to a point where the edges appear clean and straight, then let it be.
Color
Many of the high-end TVs we’ve tested have outstanding color accuracy right out of the box. But on mid- to lower-tier TVs, color adjustment could be considered the trickiest of them all. Without a calibration disc and an optical filter (or the ability to defeat the red and green output of the television), it can be tough to know if you’ve got the color just right. Just how green should a leaf look, anyway? For this reason, a calibration disc is highly recommended to achieve the most accurate color settings. We do have a couple of tricks to offer, though.
We strongly recommend you take notes of each setting and store them for future reference.
First, find out if your TV offers a color-temperature adjustment. Settings for color temperature are usually expressed in terms of cool or warm. Choose the warmest setting you have available to you as a starting point. From there, find a scene with plenty of faces in it, then press Pause.
Turn the color all the way up, and notice how everyone appears to have jaundice or a fresh sunburn. You don’t want that. Now, turn the color nearly all the way down and notice how everyone looks as if they belong in the morgue. You don’t want that either. Now adjust the color back up until the faces look natural. Each person’s face should have its own distinct hue. If it looks like real skin tone, you’ll know you’ve gotten close.
Note that you may also see references to color gamuts that your TV can reach, such as a percentage of the cinematic standard DCI-P3. These cannot be adjusted, but content with optimization technologies like HDR can take advantage of broader color gamut coverage.
Tint
We recommend that you leave the Tint setting alone, unless you are using a calibrator disc. It is a rare case in which the tint setting will need much adjustment, but it does happen. If it does, you can also use our same skin color test we mentioned above.
Important final notes
- We recommend noting or snapping a pic of your chosen settings for future reference so you don’t lose them after dialing in on the perfect ones. After all, someone is bound to come along and accidentally screw it up at some point. It’s especially prudent to record the settings if you have kids — or just a household with a lot of peripherals (or gaming systems).
- If you do watch content with HDR, that’s great, it should improve your visuals noticeably. But it won’t be the settings you chose when you calibrated your TV. You can typically calibrate individual settings while in HDR mode, but there’s not usually a need — HDR tends to find the best possible options for the content you are watching or the closest it can get.
- If you want to get the most out of your TV’s picture quality, you can always acquire new and specialized tools to further enhance performance. For example, you can use a calibration disc to micromanage the output of your television. While it uses test patterns with lesser subjectivity, you will optimize the settings on your TV. The disc itself costs a little extra, but it ultimately gives you confidence that you’re getting the best picture quality.
- If you’re not sure what to watch, we’ve got lists of the best Blu-ray discs and Ultra HD Blu-ray discs to make the most of your home theater. It’s always best to reward a hard day’s work with a cold beer or lemonade. So, grab one, have a seat, and enjoy your shiny new TV with the knowledge that it looks its best. We’ll even allow a little gloating on your part as a newly ordained home theater whiz.
- Check out our guide on manually calibrating your speakers for incredible sound to make your home theater even better. In the end, picture quality and sound quality complement each other so perfectly that you can’t have one without the other.
Editors' Recommendations
- Best Paramount Plus deals: Get your first month free
- Don’t miss your chance to get this 70-inch 4K TV for $450 today
- How to set a sleep timer on Apple TV
- You’ll be surprised how cheap this 55-inch QLED 4K TV is today
- How we test TVs


